Introduction
Jupyter Notebook is a versatile and powerful tool widely used in data science, machine learning, and academic research for its interactive and user-friendly interface. While many users install Jupyter Notebook through Anaconda, I prefer the approach of installing Jupyter Notebook directly with Python and pip, providing a lighter and more flexible setup. This guide will walk you through using Jupyter Notebook without Anaconda.
Prerequisites
Before starting, make sure you have Python installed on your system, set up a virtual environment, and installed Jupyter Notebook as outlined in our previous post, Learning Python: Part 2 – Install Python and Set up Your Environment.
Step 1: Activate Your Virtual Environment
To ensure that all your packages and dependencies are managed properly, you should activate your virtual environment. This can typically be done with the following commands, depending on your operating system:
- Windows:
.\env\Scripts\activate- maOS\Linux:
source env/bin/activateReplace ‘env’ with the name of your virtual environment if you used a name other than ‘env’. For example, the name of the virtual environment I will be using is ‘PythonFoundationBeginner’ and I am on a Windows machine and I am entering the below commands from within the directory where I saved all of my environments:

Notice the “(PythonFoundationBeginner)” prefix. This signifies that my environment is now activated.
Step 2: Launch Jupyter Notebook
With your virtual environment activated and Jupyter Notebook installed, you can start Jupyter Notebook by running the following command in your terminal or command prompt:
jupyter notebookIf asked, choose to open Jupyter Notebook in your preferred browser (My preference is Google Chrome). You should see a new browser window open. The default directory that Jupyter Notebook will open to is based on what directory you were in when you executed the command in your terminal or command prompt.
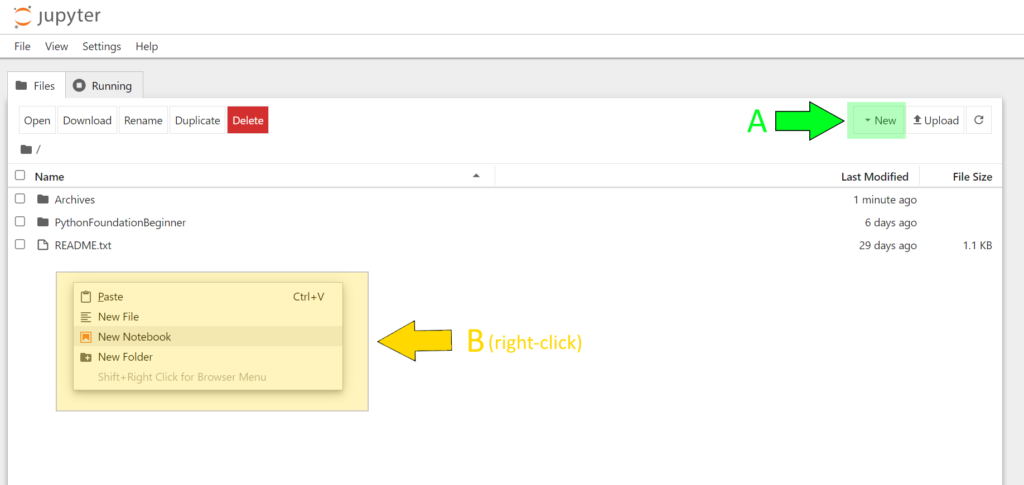
Here you have two options to create a new file:
- Option A: Click the New button in the upper right corner and select Python 3 (or any other available kernel) from the dropdown menu.
- Option B: Right-click any blank area and a new menu should appear. Select New Notebook.

You can also create an additional directory or folder anywhere you like to store your projects. For purposes of this series, I am going to create a new file using Option A above.
The Jupyter Notebook Interface
The Jupyter Notebook interface consists of several key components:
- Title: You can double-click “Untitled” to give your file a name. I will name my file “AnalyticalAscent_LearningPython”.
- Menu Bar: Located at the top, it provides access to various functions like file operations, kernel management, and notebook settings.
- Toolbar: Below the menu bar, it contains buttons for common actions like saving, adding cells, and running code.
- Markdown Cells: For writing formatted text using Markdown.
- Code Cells: For writing and executing code.

Using Markdown Cells
Markdown cells allow you to add formatted text, headers, lists, links, images, and more. To create a Markdown cell, select a cell, click on the dropdown menu in the toolbar that says “Code,” and choose “Markdown.”
In the previous section, you will notice that I have created a Markdown Cell with a header and some text. To render the Markdown, press Shift + Enter or click the “Run” button in the toolbar.
Here are some additional Markdown examples:
# This is a header
## This is a subheader

- This is a list item
- Another list item

**Bold text**

*Italic text*
Writing and Running Code
To write code in a code cell, click on the cell and start typing. To run the code, press Shift + Enter or click the “Run” button in the toolbar.
Here is another image showing both cells from the previous image after running them:

Using Magic Commands
Jupyter Notebook includes several “magic commands” that extend its functionality. magic commands are prefixed with ‘%’ for line magics or ‘%%’ for cell magics.
Here are some useful magic commands:
- %timeit – Times the execution of a single line of code.
- %matplotlib inline – Displays matplotlib plots inline in the notebook.
- %%writefile filename.py – Writes the contents of the cell to a file.
Visualizations and Plotting
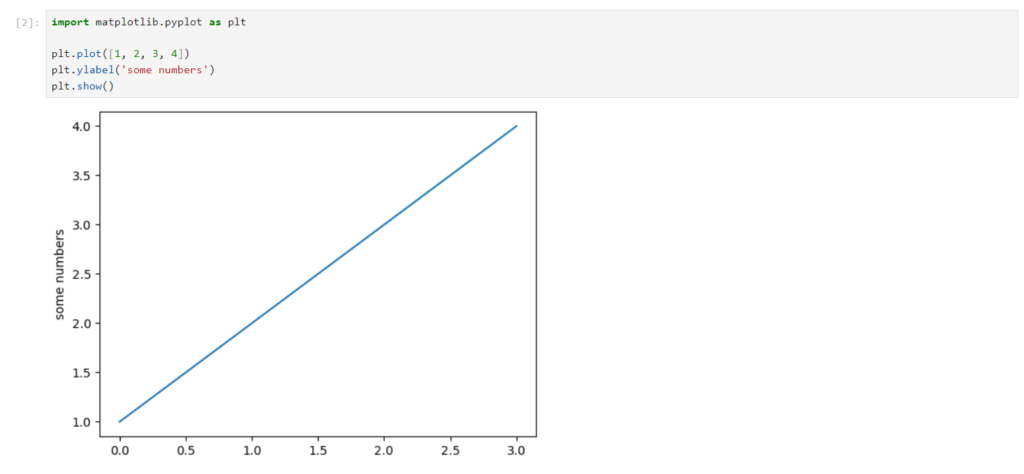
One of the powerful features of Jupyter Notebook is the ability to display visualizations directly within the notebook. For example, you can create plots using libraries like Matplotlib and Seaborn. I will provide an example of this in the image below; however, don’t worry about this for now – we will dive further into visualizations later in this series.

Saving and Exporting Notebooks
To save your notebook, click the “Save and Checkpoint” button in the toolbar or press Ctrl + S. You can also export your notebook to various formats like HTML, PDF, or Python script by selecting “File” > “Download as” and choosing your desired format.
Conclusion
Using Jupyter Notebook without Anaconda is straightforward and gives you the flexibility to manage your Python environment independently. By following these steps, you can set up Jupyter Notebook, create and run notebooks, and take advantage of its powerful features for interactive coding and data analysis. For more insights on Python and related tools, stay tuned to our blog. Happy coding!
